How to Go Road Rallying – 22nd December version (edited by Derek McLean – see below)
It may be reproduced by motor sport clubs or individuals for training and other non-profit purposes but may not otherwise be copied or published, and may not be sold.
Preface to the Third Edition
This is the third edition of this guide. I have modified the section on insurance to include the scheme operated by Bradstock, and rephrased a few paragraphs to make them read better or to reflect minor rule changes, but the rest of the content is identical. The original foreword is below.
These notes were originally written to accompany the road rally training classes run each October by Edinburgh University Motor Sport Club. The readership has since grown to include people all over Scotland and elsewhere, and in the light of this, things like the advice on where to buy supplies will seem very parochial. The thing to do is to join your local motor club and regularly attend its pub nights, where advice, whether wanted or not, inevitably flows almost as fast as the beer.
David Crooke September 1997
Foreword
This is a summary of what you need to know to get started in the sport of road rallying. It won't make you into an instant winner – there is no substitute for experience – but it will arm you with enough knowledge to get out there and enjoy an event.
The guide is based on the kind of navigational road rallies which form part of the East of Scotland Association of Car Clubs (ESACC) championship; the style of events and navigation varies slightly between different parts of the United Kingdom, and Scottish road rallies are quite distinctive, but most of this will stand you in good stead when you compete in the deep south.
Remember that this is only advice, and largely based on one person's opinion of how to go about competing in the sport. As you gain experience, you will form your own ideas about how to do things, which need not agree with those below.
Above all, remember that road rallying is purely for fun; go out and be competitive, but have a good laugh while doing so.
David Crooke October 1995
Appendix to foreword, by Derek McLean – December 2002
David and I were partners for 3½ years, and I have great respect for him. We did win the ESACC Championship three times in a row! But I have modified this treatise slightly, with the aid of the WORD program. I have done this in two ways: by tidying the format (e.g. by right justifying it); and by doing a little grammatical tweeking. David has always impressed me with his writing style, but – surprisingly – I found a few minor errors of grammar or syntax, which I have taken the liberty of adjusting in this particular version. This comprises no more than the odd comma, or the use of “that” instead of “which”. I take no credit for the content. I don’t agree with every single word, but you will not find a better introduction to the sport of navigational rallying anywhere. I salute David for a terrific piece of writing, and I am sure he would not criticise me for trying to make it just a tiny bit better still. The reason he can’t do it himself is that he defected to the west (Texas) in 1999, and has consequently lost touch with the real world!
I have just realised that some other items need to be changed in the light of developments such as the dropping of “RAC” and the change from Bradstock Insurance Brokers to Alexander Forbes. So that makes a third kind of minor amendment. I may also add a supplement at the end, if I think of anything else.
Contents
· Teamwork
· Getting Through Scrutineering
· Ordnance Survey Landranger Maps
· Tactics
· Road Rallying in England and Wales
What is a Road Rally?
The object in any rally is to get a car and its crew around a route, while complying with an often-demanding time schedule. A road rally takes place on open, public roads, and is something you can compete in with an ordinary car - in the past, an EUMSC member has won the ESACC Road Rally Drivers' Championship at Experienced level, against stiff competition, in a Citroen 2CV. A road rally isn't a 120 mph car-breaking charge through a forest, but then it isn't a church social club treasure hunt either.
As with most other forms of rallying, a road rally crew consists of a driver, a navigator and a car. The roles that the members of the crew play are somewhat different to those of their counterparts on, for example, a special stage rally.
Comparing it to other sports, road rallying is like a fast paced version of orienteering, done in a car instead of on foot.
Road rallies are legally restricted to an average speed of 30 mph. The object is to follow the correct route while maintaining this average speed, no faster, no slower. The "30 average" may not sound very fast, but there are a number of obstacles to slow competitors down; maintaining the required average speed in practice requires some enthusiastic driving.
Being the fastest on the road is not the way to win a road rally. The score is kept in terms of penalty points; you get a small penalty for being late at a time control (checkpoint), and larger penalties for being early, for missing out part of the route, for arriving at a checkpoint in the wrong direction, or for missing a checkpoint entirely.
The first problem you face is that you won't be told the route of the rally. A road rally is principally a test of the navigational skill of the crew. The route is kept secret, and competitors are given clues at the start of each section, which they must solve in order to find the correct route before they can start driving anywhere. The time taken to do this considerably eats into the allotted time of 2 minutes per mile allowed for each section.
The next weapon in the organisers’armoury is the natural topography of the roads along the route. Road rallies don't take place on motorways and major signposted roads, but on small, twisty "back roads" which provide an enjoyable challenge to the driver. Scotland has the wildest, highest countryside in Britain, and you can expect to encounter some roads where maintaining a 30 mph average speed is a challenge in itself.
Finally, there are route checks along the way. Usually, these take the form of code boards. A code board is a small temporary sign placed by the side of the road, with some numbers, letters or symbols on it. You are required to write these down on your time card. Occasionally, there will be a manned passage control, where you must stop and obtain a signature. Missing a code board or passage control is penalised heavily, compared with arriving early or late, so getting the route correct is vital.
The lengths of sections vary from as little as 1 mile to as much as 30 miles, but usually average around 6 miles. The 12 minutes allotted for a 6 mile section might be split up like this - 30 seconds to get your time card signed and get a clue at the preceding time control; 3 minutes to solve the clue; 8 minutes to drive the section; 30 seconds to stop for a passage control somewhere in the middle. This modest schedule has already brought the average driving speed up to 45 mph, and that's without having to double back if you made a mistake!
A final thing to note is that road rallies take place at night - this seems strange at first, but it is actually much safer, as there is far less non-rally traffic, and headlights give early warning of oncoming cars. Darkness also allows you to use your own car's lights to pick out the road ahead.
The Role of the Driver
It is a common misconception that a navigator solves the clues and a driver drives the car. A successful road rally driver does not merely drive and leave the navigator to do everything else. Before an event even takes place, the driver must prepare and check over the car, to make sure it will pass scrutineering, to make sure the necessary equipment is there, to be sure the car will last the night, and to ensure there is enough fuel!
On the event, the driver must support and assist the navigator in every way possible - by helping to solve clues, by supporting the navigator's decisions, by keeping calm and helping to build a spirit of teamwork. It is also the driver's responsibility to spot code boards. [Derek’s comment – I lost us as event by failing this particular test; my excuse was that it was daylight, and it was on an urban road; a feeble excuse.]
A good driver will also help the navigator with tasks like timekeeping - if you can keep track of the timing in your head it acts as a useful backup to the navigator's calculations.
· Prepare the car before each event
· Support and assist your navigator
· Stay calm
· Watch for code boards
· Drive!
![]()
The Role of the Navigator
It is the skill of the navigator which decides how competitive a crew is on a road rally - a fast driver or a fast car can at best save a couple of minutes here and there on the longer sections, but a good navigator can save hundreds of penalties that might be dropped by a less experienced one. Most drivers inevitably have a lot of experience - most people drive their car every day - but navigating involves learning a range of new skills. Being a successful navigator involves careful preparation before a rally, and juggling a number of priorities during the event itself.
The first and most important rule for a navigator is: No matter what is happening, never, never lose your place on the map. If you actually get lost during a rally, you're sunk. [Easier said than done, Dave. Even you got lost occasionally!! – Derek]
The navigator's next most important duty is to direct the driver. Make sure that the driver knows where you want them to turn and when you want them to stop, especially if you are busy doing something and not giving your full attention to giving directions. We suggest you start by giving directions at junctions using part of the system described under "Reading the Road", and then build road reading into it as your confidence and experience grows.
The next task for the navigator is to keep track of the time. The navigator should know when there is time to dawdle, and when to hurry; what time to book in at a time control; when time is getting tight and it's necessary to pull back time or to "cut and run". Good timekeeping is one of the most difficult navigating skills to learn.
A navigator handles the paperwork during the course of the rally; this means keeping clues and time cards in order, as well as things like not forgetting to write down the code boards!
It is the job of both team members to help solve the clues where needed, but simple clues should be solved by the navigator alone, allowing the driver to get on with the job. Many clues can be solved "on the move" in this way, and this can save a lot of time.
Another skill for a navigator to practice is the art of road reading. Good reading will help you keep your place on the map, and directions to turn at junctions can be inserted in the flow of road reading information. A driver gains confidence and enjoys the driving more when the road is being well read.
Finally, it is usually up to the navigator to make tactical decisions; the navigator is far better informed to do so. A driver and navigator should come to an understanding about this point - some drivers prefer the navigator to take all the big decisions (and the blame when things go wrong) while others like to be consulted.
· Keeping your place on the map
· Giving directions
· Timekeeping
· Paperwork
· Clue solving
· Road reading
· Tactics and Management
Teamwork
Good teamwork is an essential part of a successful rally crew. Most people who go road rallying stay together with their regular driver or navigator wherever possible. Successful crews work to build up a rapport, so each knows almost instinctively what the other is thinking, and they can communicate information in very few words. A driver and navigator need to build up trust and confidence in each other's abilities to help them relax and perform at their best. [Derek’s comment – “few words” is an essential piece of advice. Drivers are not noted for being able to take in long strings of data while concentrating on what is directly in front of them. Example – “There is a tee-junction about 200 yards ahead and I want you to turn right at it” contains grossly too many words. Better to say “Tee-junction right, 200.” Much less strain on the poor driver’s brain. Also, by the time the excess verbiage has been sorted out you are likely to do a tee-junction straight on – i.e. into the field!]
Car Preparation
One of the principles of road rallying is that it should be possible to compete in an ordinary, standard car. This is largely true, but there are a couple of minor modifications that you'll want to make to your pride and joy.
Before you start, you need to make sure the car is up to scratch. A basic criterion would be that the car is capable of passing an M.O.T. on the day of the rally, and everything is in working order. A road rally is a bit more demanding on the machinery than going to the supermarket; overdue maintenance and botch jobs will come back to haunt you.
The first area concerns requirements mandated by the technical regulations. On top of the normal requirements for a car to be used on the road, you'll need the following:
· Insulation on the battery terminal - if your car doesn't have a nice red rubber cap on the positive battery terminal, it will need to be taped over.
· A warning triangle - competitors on a special stage rally are required carry a reflective warning triangle that can be displayed to warn subsequent cars in the event of a breakdown or accident. Although a triangle is not mandatory for a road rally, many scrutineers believe it is, and in any case it is quite a good idea to have one. Although not very suitable for road rallying, some Mercedes-Benz cars come already equipped with a triangle.
· Any loose objects likely to move around must be strapped down or removed from the car. If you're in the habit of keeping lots of junk in the car, remove it for the duration of the rally.
You need to provide a working environment for the navigator; usually all that is needed is a small gooseneck map light. The car's interior lights are usually not suitable while driving as they are too bright and cause reflections, but you can turn them on when stopping to solve a difficult clue.
An alternative or good supplement to a traditional map light is to strap a fluorescent light to the navigator's sun visor - the advantage of this is that it gives off a natural white light which makes it easier to distinguish colours on the map, particularly yellow and white. It is most useful when you stop to solve a hard clue, but can often be left on while driving "off the pace" as the windscreen reflection is not too bad. A fluorescent lamp is no good on its own - it must be complemented by a light that can be used on the move, preferably a poti (see below).
If your navigator likes to use a poti you will need to provide a power point for it; if the car has a cigarette lighter socket, it is the easiest and cheapest option.
We now come to modifications to make the car more drivable. The first and most important thing is lighting - the standard headlights in most cars are just about adequate for driving on wide, open main roads with lots of white lines; on a "yellow" in the middle of nowhere at 3 a.m. they are next to useless. The normal course of action is to fit a pair of supplementary driving lamps - make sure you get "driving" lenses and not foglights or pencil beams. The best value budget lamp is the Ring Phazar - avoid cheap plastic-bodied lamps, the small saving isn't worth it. Go for 100W bulbs in preference to 55W or 130W - the 55W ones aren't very bright, while the 130W ones have a very short life. If you can't fit spotlights, at a minimum fit high power bulbs to the normal lights, but only if the car has good quality headlights and the wiring can take it. When buying extra lighting, be sure to calculate the total load on the electrical system and ensure it stays well within the alternator's capacity.
A word on the legal requirements - spot lights must be fitted in matched pairs, and wired with a relay so they can only come on in conjunction with main beam headlights. A good way to tap the headlight wiring is to use a 3M Scotch-Loc connector. Cars made after January 1985 (late B reg.) cannot use uprated headlight bulbs; cars made after January 1989 (late F reg.) cannot use bulbs over 55W in driving lights either. Driving lights must be fitted at certain locations on the car, not too far apart, not too high or too low, etc. so be sure to check the advice on the packaging.
Other modifications to the car are far less important - people road rally everything from a completely standard car to something that is fully prepared for stage events, but the specification of the car makes little difference to competitiveness. The next area to look at is handling - bigger tyres, better brakes and more aggressive suspension can all help, depending on what the car has already, but avoid "boy racer" lowering kits as they will make your life a misery on bumpy back roads. In a "shopping car", better seats from a sportier model are worth considering. Apart from exceptional circumstances, tuning the engine for more power should be a very low priority.
It is wise to carry a small kit of tools and spares on the rally - the rule for selecting this kit should be to include only those things which you can fix by the side of the road, in the dark, in under half an hour. Carry a comprehensive set of spare bulbs for the car and the map light / poti. Ignition parts such as spark plugs, HT leads, a coil and a distributor cap are also useful. A torch and a small selection of spanners, pliers and screwdrivers will suffice for most repairs. Three essential things you should never omit from a rally kit - a roll of silver cloth tape ("gaffer" or "duct" tape), a towrope, and a can of flushing agent such as PlusGas or WD40.
Flat tyres are fortunately rare on road rallies, but it is essential to be able to change one quickly. Make sure you have a serviceable spare with legal tread, and a good jack and wheelbrace. If your car has a "space saver" spare (2CV wheel) get a full size one from a scrappie’s and strap it down in the boot. If you have locking wheel nuts, remove them and replace them with normal ones for the duration of the rally. Cars that are prone to shedding wheel trims should have them removed or strapped down too - Cavalier owners take note!
Getting Through Scrutineering
In principle, a road rally scrutineer is allowed to check anything specified in the construction and use laws, and anything that might be checked for an M.O.T. Additional requirements stated in the MSA regulations or the SR's for the event can also be checked; this applies to maps as well as cars!
Avoid thinking of the scrutineer as an adversary or red tape official who is trying to come between you and your fun; the purpose of scrutineering is ultimately to ensure your own safety and that of your navigator. Take pride in keeping your car in a good enough condition to breeze through scrutineering at every rally you enter. If your car can't come up to scratch, then it probably isn't safe to rally it.
A scrutineer will usually take 5-10 minutes over each car, checking a number of points. The usual scrutineer's checklist is something like the one below - ensure your car complies with it before you leave home. No scrutineer ever likes to exclude someone from a rally, but don't put them on the spot, because they will if they have to.
· Tyres – in good condition, with legal tread, including any spares.
· Lights – an extensive check will be made on every car. They must all be working, and wired correctly, e.g. driving lights must only come on with main beam headlights, and fog lights only with dipped beam. All bulbs should be of legal ratings and all extra lamps in the correct places. Any event restrictions (e.g. no more than one set of extra lights) must be complied with. Large spotlights fitted to the boot lid for quick reversing are a touchy subject as they are often used by unscrupulous people to deter following competitors!
· Noise – no more than 102 dBA measured 50cm from the exhaust pipe at a 45 degree angle, with the engine running at 5,000 rpm, or 3/4 of redline if it's a diesel. A standard exhaust in good condition will pass with ease. Rear-engined cars can be problematical but testers are usually sympathetic and may do a test from the side of the car instead.
· Seats – should be firmly anchored with stable backrests. Seat belts must be fitted and working.
· Brakes – pedal must be firm, and handbrake working. Make sure your brakes are in top condition and well bled. Scrutineers have been known to ask for a road test demonstration.
· Engine Bay – battery secure (it's surprising how often cars fail on this) and positive terminal insulated, no dodgy wiring, engine secure, throttle return springs working.
· Exterior – no major dents, sharp protrusions, rusty bodywork, etc. A dilapidated and badly cared for car may raise questions about its structural integrity.
· Interior – nothing loose that can fly about the car; if you're in a habit of carrying junk, empty the boot and leave it at home. Strap down or stow spare tyres, jacks, tools, etc.
· Suspension – wheels are given a good shake to ensure the suspension is secure and the wheel bearings are serviceable.
· Fluids – there should be no significant leaks of coolant or oil, and definitely no brake fluid or fuel.
· Fuel – you are not allowed to carry cans in a competing car.
· Warning Triangle – although this isn't mandatory for road rallies, most people think it is, and it's a good idea to carry one anyway, so be sure to have one!
· Road Tax – must be up to date
Driving Technique
You don't have to have a quick car or drive like Colin McRae and Juha Kankkunen to win a road rally. There is a traditional homily "to finish first, first you must finish" and it applies to road rallying more than any other sport. The amount of time and penalties you might save by going a little faster is small compared to the amount of penalties you incur by missing a single code board, or the time it takes to pull a car out of the ditch!
The most sensible approach is to drive at a moderate pace as you would if you were not doing a motorsport event, and to concentrate as a crew on getting the navigation right and getting all the code boards. After a few rallies, when you build up a rapport and your navigator becomes proficient at reading the road, use this information to help you judge the corner ahead, but never trust the reading. Reading the road is a very demanding skill, and it is difficult to see every corner on the map; also, because of the small scale, the maps are often quite inaccurate, merging two opposing sharp corners into a single, more gentle one. As a bonus, every Landranger contains one or two infamous "not as map" corners where the cartographer has simply got it wrong. You have been warned!
Remember at all times that you are competing on open public roads, and you can come across anything around the next corner; a lost competitor coming the other way at speed, a tractor doing 3 mph and dropping manure and mud everywhere, a local resident out keeping an eye on the rally under the pretence of walking their dog at 2 a.m. It is easy to get carried away in a rush of adrenalin, so you should go into each and every corner with the thought at the back of your mind that it might be tighter than it looks or you might have to stop in a hurry.
The biggest difference between driving on a road rally and driving for transport is that because you are trying to maintain a moderate pace on twisty roads, you are continually accelerating and braking. The normal brakes and brake pads on most cars will not take this sort of punishment indefinitely, and will begin to overheat and lose performance. The most common problem is "pad fade"; the brake pedal is still firm, but the car doesn't slow down as much as you expect. A less common problem is "fluid fade", when the heat from the brakes boils the brake fluid – when this happens the pedal is very spongy and may require some pumping to get any effect from the brakes. Be watchful for the onset of brake fade, and take it as a sign to take things easy, slow down in plenty time for corners, and use the engine and gears to help slow the car.
On a rally you are required to obey the rules of the road at all times, and drive sensibly. There are a couple of additional restrictions. The first is that you must come to a complete stop at all junctions where you have to give way. The second restriction is what is called a "Quiet Zone" - these are areas designated by the organisers where competitors must pass through making the minimum of noise, in order not to disturb local residents. Typical Quiet Zone restrictions require you to drive gently, at less than 30 mph, in a high gear (4th or 5th) and with dipped lights and no driving lights. The regs. for the event will define what constitutes a Quiet Zone; usually, they are all villages or towns with 30 mph speed limits, and any other areas marked by a "Quiet" board. It is in your interest to obey these rules, as there may be a Driving Standards Observer watching; it is also in the interests of the sport at large, as it is essential that we are courteous to people who live near rally route.
[Derek’s comment – “regs.” will be described in detail later on. Suffice to say here that they provide the initial introduction to the event’s existence. The word is simply short for “Supplementary Regulations”.]
The Navigator's Toolkit
As a navigator, you will need a number of items to enable you to plot and solve clues. The list below is divided into three categories - items on the first list are truly indispensable; treat the second list as things you really should have, and buy them as you can justify and afford the cost. They're listed in order of priority rather than cost, so check down the list and collect up anything you already have and put it in your kit. The third list contains things that you may want to collect gradually as you gain experience and move up to competing in higher classes.
Essentials
· Maps – obvious but true! Make sure you have the correct edition of each map as specified in the event regs. and that you have prepared it properly.
· Pencils – carry several pencils, which should be fairly dark; 3B or 4B grade is ideal. These can be obtained from art shops and most stationers. Normal pencils, which are HB, are not dark enough to show up well under a map light or poti. Never write on a map in ink.
· Eraser – this should be of the very soft, clear white type. The ones found on the end of pencils are a bit too harsh and will fray the map surface.
· Map Board – you will need a surface to lean on while drawing on the map. This should be made by taking two layers of cardboard from an old box (or one layer from a thick box like you get with a microwave or big TV) and cutting out a rough square and taping the edges. Do not use wood, metal, rigid plastic or anything else that is too substantial, as your gut will wear it in the event of a crash. The board should be as big as will comfortably fit in your lap with the car seat all the way back, without obstructing the driver or fouling on the dashboard. If you intend to use the "origami" map folding described below, make the board exactly 46cm square so you can clip the map to it.
· Map Light – in addition to the car's interior lights, which you can use while stopped, you need a light that you can use to see the map while driving along. Ideally, get your driver to provide a gooseneck map light, either a temporary one in the lighter socket, or preferably one that is permanently mounted. Permanent map lights are best mounted low down, e.g. on the top edge of the door. A poti (see below) is very useful in conjunction with a map light, and is even adequate alone without one. Don't bother with the cheap £2.99 disco DJ's deck lights - they're not up to the job.
· Romer – this is a small piece of plastic with map scales etc. printed round the edge. The most useful part of it is the top right corner, which has 1:50,000 scale map gradations (divisions of a grid square) marked along and down it, counting backwards from the corner. When you place the correct numbered marks on the grid lines of the map, the corner of the romer shows the point the map reference refers to. This is essential for accurate plotting of 6 and 8 figure map references. Most romers have a hole in them; it's a good idea to loop a piece of string through it and hang it round your neck so you don't lose it under the seat.
· Digital Watch – you need to know the exact time to decide when to book into time controls and how you are progressing. A watch that shows seconds on the main display is best, but one without seconds is about adequate as long as you can set it exactly to the second to be synchronised with rally time – this type only costs about £1.99 from a junk shop, but make sure it's reliable! You should have at least two time pieces in the car set to rally time, as a backup – set the driver's watch or car clock too.
· Travel Sickness Cure – navigating involves spending a lot of time with your head down while the car is in often violent motion. Inevitably, this can lead to a feeling of queasiness. This affects some people more than others; a heavy meal just before the rally is a bad idea, but a light snack may be better than starting on an empty stomach. Some navigators do without anything, while others eat sweets or take pills. Experiment to find out what works best for you, and don't take anyone else's method as being the absolute truth - with most remedies, the placebo effect is just as important as any chemical one. Having said that, it is generally agreed that the best pills are the "Stugeron" brand. Be sure to follow the directions, which usually tell you to take them a couple of hours before you start the rally.
· Highlighter Pens – the style of map preparation is a matter of personal taste, but most people prefer to highlight certain features with fluorescent pens. You shouldn't actually need these during a rally, as you will have already prepared the map!
Highly Desirable
· Clipboard – a cheap A4 clipboard is perfect for keeping together all your rally paperwork
· Calculator – some clues will involve a bit of arithmetic to solve them, and a calculator will save you a lot of time. The four basic functions are all you need. A solar one isn't much use under incandescent light, so get a battery powered one.
· Poti – a poti is a squat plastic cylinder about 5 or 6 inches across, with a large lens set in the top, and a small bulb in it. You place this on the map and it lights up and magnifies a small area. These are quite expensive, starting at around £30 – the Terrain Follower brand at this price is the best value. Don't pay extra for features like dimmers and coloured bulbs; they are rarely useful, and if you want one, you can fit it yourself much more cheaply. You need to arrange power for the poti in the car; the easy way is to fit a cigarette lighter plug (around £1 from Omni Electronics on Dalkeith Rd.) but be sure your driver's car has a socket! Special plugs and sockets are more expensive and mean you can't easily take your poti into another car, but use one in preference to bodging a connection into the interior light wiring. Many people compete without a poti, but once you use one you'll wonder how you managed without it. A cheaper alternative is a handheld magnifier with built in light, but choose a good one with a base that supports it a fixed distance from the map. Always carry a spare bulb for your poti. The only shop in Edinburgh which stocks potis purpose made for rallying is Sportstune on Brandon Terrace. [Derek’s comment – there is a better (more positive) connection readily available by way of a smaller DIN-plug system. You can also get a dual-purpose plug that will go into either type of socket. If you don’t have a regular driver it may be better to go for this type.
· Ruler – some clues require a geometric construction of the form "draw a line from A to B" or measurement of a distance along a bearing. A 30cm ruler is usually adequate, but a 45cm one can occasionally be useful, as nasty organisers will design a clue to need a straight edge a little longer than 30cm. Remember when measuring that the scale is 1:50,000 and so e.g. 700m in reality is 14mm on the map.
· Pencil Sharpener – obvious!
· Tracing Paper – for clues that are themselves things traced off the map.
· Protractor – the odd clue will involve measuring an angle or bearing. A normal school protractor is usually adequate, but a large 360 degree one is nice to have.
· Drawing Compasses – handy for the odd clue that says something like "pass within 3.4 miles of this point"
· Decoding Wheel – many coded clues use a substitution of the form "A=1, B=2, ..., Z=26". A code wheel is two cardboard discs, one larger than the other, fixed together with a pin in the middle. Write the letters A-Z and Z-A round the edge of one disc, and numbers 1-26 (with a zero as well in the 26 box) round the other. By aligning the discs you can use it for most codes of this type.
Luxuries
· Mileage Wheel – a small device, often in the shape of a fat pen, which measures the distance as you roll it along the map. This is a handy confirmation of the mileage if you have to guess part of the route, but it really comes in useful when organising a rally. [Derek’s comment – if you want to be a pub bore, the technical term for this device is “opisometer”.]
· Magnetic Compass – useful as a check if you get really lost, but if you're paying attention you should never need one. You will only get a useful reading outside the car, since steel is a very magnetically permeable material.
Ordnance Survey Landranger Maps
The maps used for road rallying are the ubiquitous Ordnance Survey Landranger series. The scale is 1:50,000, so each 80cm square map covers an area about 25 miles across; the series covers the whole of mainland Britain and the major islands in just over 200 overlapping sheets. Most road rallies will require one or two maps, but occasionally longer events will be spread over three sheets if the third one contains a few particularly exciting roads.
Modern Landrangers are composed entirely in metric units, and use the national map reference grid based on 1km squares. These can be obtained in their pink cardboard covers from most bookshops, newsagents and even petrol stations, and cost around 5.00 each. The best sources in Edinburgh are the main branch of James Thin on South Bridge, Waterstone's on Princes St., and camping shops. [Note by Derek McLean – Government Bookshop in Lothian Road is a newer stockist too.]
Landranger maps are well prepared, contain a lot of information and are excellent value, but it is worth bearing in mind that they are not intended for motor sport use, and so represent a bit of a compromise. The scale is a bit smaller than an ideal size for road reading, and the cartography is rather variable - the representation of the roads varies from very precise to rather vague wandering lines drawn freehand.
The Key
There is an extensive key down the right hand side, which defines all the map features. It is worth learning what these are so you can acquire the skill of looking at a piece of the map and visualising what the area it represents will look like.
Edition Numbers
A vital point for road rallies (but not for many other purposes) is to have exactly the same map as the organisers. The SR's for an event will specify which sheet numbers you will need, and the editions of each. The edition number is found at the bottom of the key, next to the words "Made, printed and published by Ordnance Survey, ..." and is a capital letter often followed by a number, e.g. "A" or "B3".
Be careful when buying maps as most shops are not aware of edition numbers and there is often old stock lying around. It is not impossible, particularly with more northerly events, to be in the situation where the organisers have planned the rally using an old edition of the map, and a new edition has come out before the event takes place. If you can't obtain the version they specify, contact the organisers and explain your plight; they will usually deal with the problem at their end by making sure the clues work on both editions.
Examples
All the examples in the rest of this guide are real, and are taken from Landranger Sheet 66 "Edinburgh and Midlothian area" edition B2, which was published in September 1995. They should be largely valid for later editions of the map.
Map References
A national grid map reference gives a precise location on the map in terms of the grid lines printed on the map in blue. A map reference is given as an even number of digits - the first half of it refers to the "eastings" which run across the map, the second half to the "northings" which run upwards.
By convention, a map reference does not refer to a point, but a square area whose size depends on the accuracy to which the reference is quoted. On road rallies this only applies to four figure references, which refer to whole grid squares; six and eight figure ones can be considered as points.
· Four Figure – these refer to an entire 1km grid square; the square is the one to the right of the vertical grid line and above the horizontal one, e.g. 3458 is the grid square containing Halkerston Farm
· Six Figure – these refer to a point to an accuracy of 100m (2mm on the map) e.g. Halkerston Farm is at 347583. When a driver is reading map references aloud from a clue and a navigator is plotting them, it is conventional to read the grid square first, e.g. 347583 is "thirty-four, fifty-eight, seven, three". This is helpful because you need to locate the grid square first when plotting the reference. A crew should decide on whether to use this convention, or to read map references linearly.
To plot this with a romer, first find the grid square, then position the "7" mark on the top edge of the romer on vertical grid line 34, and the "3" mark on the right edge of the romer on horizontal grid line 58.
· Eight Figure – these are used to give very exact references, e.g. when you need to distinguish the two halves of a dual carriageway. The "extra" digits, as compared to a six figure reference (i.e. the 4th and 8th ones) will only ever be 0 or 5. In our example, the entrance to the farm from the yellow road is at 34755830; this is read "thirty-four, fifty-eight, seventy-five, thirty".
· Letters and Prefixes – map references only refer to a point within a 100km by 100km area; on a rally this is not a problem, as each Landranger covers an area less than a sixth of this size. To give a map reference that is unique across the whole country, you need to specify the two letter code for the area. Sheet 66 is in area NT so the example above would be NT347583. Instead of using these letters, rally organisers often use the sheet number as a prefix, e.g. 66/347583.
The following map references all plot at road junctions - try them and see:
· 399649 – Entrance to Remote Farm, near Pathhead
· 468685 – Yellow road crosses B6355
· 419523 – B6368 and white meet A7
· 40806360 – Farmyard at Whitburgh Mains (white crossroads)
· 49506345 – Stobshiel Farm
· 24208955 – Fork on drive into Kilrie Farm
Map Preparation
There are two things to do to a Landranger to prepare it for road rally use. The first is to fold it; a map is 85cm (nearly 3 ft.) square and it's not very convenient to have it spread out in the car, as the driver can't see the road. If you fold it properly you should be able to use it without making it larger than the map board. The second part of the preparation involves highlighting and marking in certain features on the map to make them easier to find under the relatively poor lighting in the car.
There are three methods of map folding described below - each has its own advantages and disadvantages, and none of them is perfect. Try whichever appeals to you first, but once you've done a few rallies, consider giving one of the others a try or make up your own. For brevity, the descriptions below refer to grid squares on the map, assuming that the bottom left corner is 0000, the top right is 4040, the bottom middle is 2000 etc. Maps don't start from 0000, so you'll have to allow for that. It's much easier to understand once you see it done than it is to describe.
Map Folding 1 - Normal Folding
This method takes advantage of the folds already present in the map when you buy it, which divide it into 28 panels, each about 6 grid squares wide and 10 high. The idea is to work sharp folds into the map so you can lay out any 4x2 group of panels - this area nicely covers an average map board and is big enough to cover show the whole of a rally section.
![]()
![]()
![]()
![]()
![]()
![]()
![]()
![]()
![]() 40
40
![]() 30
30
![]() 20
20
![]() 10
10
![]() 0
0
· Carefully detach the cardboard cover from the map, ensuring that you don't tear either of them. A knife or razor blade will help. Keep the cover, as you might need it.
· Have the map with just the first fold open, so the map is two panels high and one wide. You'll see that it's in a stack of fanfolds. Work these folds by fanfolding it the opposite way and back a few times until they all work smoothly in both directions.
· Unfold the map fully. There is a sharp fold across the middle of the map from about 0020 to 4020 - you need to put in two more, at one quarter and three quarters of the way up the map, from approximately 0010 to 4010 and from approximately 0030 to 4030. These only need to work in one direction, with the printed side of the map outwards. Use the blunt line of folds already present as a result of the fold in the map cover; pinch the convex folds flat, and then pinch flat the concave folds in between. When you have a sharp line, work the fold in fully.
· Finally, open the map flat again and work the vertical fanfolds in a strip the full height of the map.
To use the map in the car, fold it in half along the original machine fold (0020 to 4020), keep the top or bottom half uppermost as needed, and fanfold about half the width of the map underneath at the sides. As the rally progresses east or west, flip a fanfold under at one end and bring one out from the other. When you need to change to the other half of the map, flip it over.
Occasionally you may meet a section of a rally that crosses back and forth between the top and bottom halves of the map; this is when the extra horizontal folds come in useful. Have the driver stop for a few seconds, open the map fully, and fold the top and bottom quarters underneath, leaving the middle half. Fanfold the ends in the usual way.
Pros and Cons: The advantage of this method is that it doesn't require butchering the map, and you can fold the map to show any point on the map and a clear space of 10 grid squares in each direction around it. The disadvantage is the occasional need to stop and do a main refolding of the map - on average, this might be once a rally.
Map Folding 2 - The Origami Method
This method of map folding involves cutting and folding the map, so that with a flick of the wrist you can have one of four map board size portions in front of you. It is quite complicated, so don't rely on the explanation below; be sure to see a demonstration before trying this at home!
This method requires making very exact folds and cuts; unfortunately, the map arrives with a machine fold less than 1cm from where you will need to make one. For this reason, if you buy a pre-folded map, you will need to iron it gently to take out the creases. It is possible to get Landrangers as "flat sheets", rolled up like posters, from an OS dealer; unfortunately, the nearest OS dealer is in Dunfermline, so if you really want flat sheets you'll have to order them. Another disadvantage with flat sheets is that they don't come with a cover; occasionally clues refer to the list of names on the back of or inside the cover, so you'll need to buy at least one folded map. In general, flat sheets don't come highly recommended as they're more trouble than they're worth.
![]()
![]()
![]()
![]()
![]()
![]() 40
40
![]() 30
30
![]()
![]()
![]() 20
20
slit
![]() 10
10
![]() 0
0
0 10 20 30 40
· Carefully detach the cardboard cover as above, and gently iron out the creases in the map.
· Cut off the key to leave the map square; if you want to trim it exactly, cut round the outside of the thick black lines with the longitude and latitude marks, but do not cut them off. Don't throw the key away; every key is slightly different, e.g. the sample map reference is always on the map, and special features are sometimes described.
· Make exact folds along the following lines, which are one quarter, half and three quarters of the way up or along the map. Work each fold in both directions. Pencil in numbers 0 to 40 along the bottom and up the side of the map so you don't get confused. Every fold must be exactly on the grid line for this to work well.
o 0010 to 4010
o 0020 to 4020
o 0030 to 4030
o 1000 to 1040
o 2000 to 2040
o 3000 to 3040
· Make a slit across the middle of the map, from one quarter to three quarters of the way across (1020 to 3020). Do this carefully and accurately with a craft knife or razor blade; bleeding all over the map is not helpful.
· Pull up the middle of the map, along the vertical line from 2000 to 2040, leaving the left and right quarters of the map on the table. The one quarter and three quarter lines should meet. Fold the top half of the bit you picked up to the left, and the bottom half to the right (this is what the slit lets you do). Smooth the folds.
· Now, pull up the middle of the map from left to right, leaving the top and bottom quarters on the table. Fold the bit you pulled up flat, either on the top or bottom of the map. You should end up with a square about 45cm in size.
To use this map, start with it folded as described above, and attach the four corners of the sheet to the map board with bulldog clips. You can fold it to show any quarter of the map by flipping the folds left to right and up and down.
Remember to keep the key handy in case you need to refer to it. An alternative to cutting it off, which some people prefer, is to make a slit vertically, from a quarter to three quarters of the way down the edge between the map and the key. The key then remains attached to the map and can be folded onto the back of the map board.
Pros and Cons: The advantage of this method is that you never need to refold the map, and you have instant access to any part of it. There are two big disadvantages; the first is that the grid line numbers on the edge of the map don't correctly match the grid lines on the folded parts of the map - to overcome this, extensive marking of grid numbers is necessary (see "Marking" below). The second is that there are quite a lot of edges between the quarters, and working on a section that passes back and forth across them is awkward at best; a section in the centre of the map is a nightmare. Cutting a hole in the map is also not entirely desirable. If you plan to use this method, you should at least consider....
Map Folding 2(b) - Origami to Black Belt Standard
The problem of the folds and joins in the map can be partially resolved by putting in extra folds. These additional folds go along the "three-eighths" and "five-eighths" lines horizontally and vertically; the map references for these lines are:
· 1500 to 1540
· 2500 to 2540
· 0015 to 4015
· 0025 to 4025
![]()
![]()
![]()
![]()
![]()
![]()
![]()
![]() 40
40
![]() 30
30
![]() 25
25
![]()
![]() 20
20
![]() 15
15
![]() 10
10
![]() 0
0
0 10 15 20 25 30 40
This enables you to see the area around the vertical centre line of the map by flattening the flap, using the vertical "eighths" folds. To see areas around the horizontal centre line, fold both the top and bottom flaps to the correct side, then pick up the main fold between the top and bottom half and flatten it using the "eighths" folds. You can view a small area (10 by 10 grid squares) at the exact centre of the map by flattening the both the top and bottom flaps to show the vertical centre line, and then picking up and flattening the main horizontal fold.
Needless to say, this method requires folding to sub-millimetre accuracy if the map is to work smoothly. This is critical to success in matching up the parts of the map either side of the centre slit.
Pros and Cons: It is an improvement over the basic origami method, but the view in the centre of the map is still quite restrictive. One for the more adventurous.
Map Folding 3 - The Star
This is a simple folding method, and in some ways is a compromise between the two previous methods.
![]()
![]()
![]()


![]() 40
40
![]() 20
20
![]() 0
0
0 20 40
· Detach the cover, cut off the key and iron the map as for the origami method.
· Put in folds along four lines - fold the map in half vertically, horizontally and along both diagonals. The diagonal folds only need to be concave, but work the orthogonal folds well in both directions.
To use this map, pick it up in the middle so all four diagonal folds fall together, then fold the flaps flat leaving a quarter of the map showing on each side, and lay the map flat on the board. To change to an adjacent quarter of the map, fold a flap over and rotate the map 90 degrees, or you can just flip it over.
[Derek’s comment – when you hold the centre point up with the four diagonal folds hanging vertically, the whole thing looks a bit like a dart-flight. The orthogonal folds are sticking out at 45°. It can be presented very quickly in any quarter of the map. The drawbacks are that the middle is very difficult to deal with, and down the folds can be a bit awkward too. The latter can be overcome by adding supplementary folds approximately on the 8 in-between compass points (NNE, etc.), and using these as required to allow viewing of the corners. The centre of the map is still a problem. See my footnote at the end for another tip.]
Map Marking
The purpose of marking up the map is to make things clearer in the dim light provided by a map light in a car. Always keep this in mind, as it is easy to get carried away and turn your map into a garish technicolour display. The golden rule: never do any marking which might obscure a map feature. If you're preparing a map for a tabletop, it's often advisable not to mark it up at all and leave it plain, as the lighting will be good, and you will have plenty of room.
Marking a map properly will take about an hour and a half the first time you do it, but this time will come down with practice.
For marking a map, get a good selection of highlighter pens (yellow, orange and magenta are the most useful colours) and a very fine tipped black felt tip pen, as might be used by a draftsman.
The two most important things to do are make sure there is plenty grid line information, and to mark spot heights. The pale blue numbers used for the grid lines are only repeated once every ten lines, and are quite hard to see in poor light. Here are some ideas for improving the visibility of grid line numbers - they can be used in combination, but don't do them all.
· Ink over the existing grid numbers
· Write in repeat numbers every 5 grid lines
· Highlight the numbers
· Draw tick marks or full lines in highlighter across the map at intervals of 5 or 10 grid lines respectively.
Most people mark spot heights by highlighting the number in a strong colour like orange or magenta. It is a good idea to only highlight the ones that fall on the road, as they are the most often used. If one falls near a road but the spot isn't on the road, circle it or use a different colour to show that you didn't just miss it when marking up.
When highlighting small features like spot heights, run along rows of grid squares in a systematic fashion so you don't miss any.
Here is a typical marking scheme – you may wish to follow it, or change it, or make up your own. It's all a matter of taste:
· Spot Heights – Highlight ones on the road in orange, circle those close to but not on the road.
· Grid lines – Mark a cross in magenta highlighter every multiple of 5, and draw full lines the length of the map every multiple of 10.
· Grid Line Numbers – yellow highlight
· Graticule Intersections – Draw over in fine black.
· ETLs – Thin line of yellow highlight
· Main road numbers – yellow highlight
The process of marking up the map should be done one or two days before the rally; it can be quite instructive, since while you are doing it you end up studying the map in detail and becoming familiar with it. With a bit of experience, you can pick out roads that will make good road rally routes, and notice features that can be used to make elegant and tricky clues.
[Derek’s comment – I used to draw the complete latitude and longitude lines in red fine-point pen, to highlight them. I also used to highlight the SHs in yellow, because a darker colour could obscure something else.]
Clue Solving
Solving the clues quickly and correctly is the essence of road rallying. If you can do this, you're most of the way there. This section gives a general guide to clue solving, while the next is a compendium of standard clue types that you're bound to run across.
The navigator ends up solving most of the clues, but remember that it is a team effort; the driver should help by reading out long sequences of numbers or other information while the navigator plots it, or lend a bit of brainpower if it's a tricky one.
Abbreviations
There are a number of standard abbreviations that you should be aware of. The ones used vary slightly from rally to rally, but a careful organiser will list them in the Final Instructions. Check the Final Instructions (F.I.s) carefully when you receive them; the abbreviations may be different from the ones you're used to, or they may contain dirty tricks such as "TR = Turn Left". Some of the standard abbreviations usually used on EUMSC rallies are:
Y Yellow BL Blue ETL Electricity transmission line
B Brown W White CRO Coloured Roads Only
BK Black SR Side Road GI Graticule Intersection
TL Turn Left TR Turn Right AR Consider All Roads
FL Fork Left GL Grid Line IGR Ignore Gated Roads
FR Fork Right TJ T-Junction XR Crossroads
SH Spot Height km kilometres PC Passage Control
GS Grid Square SO Straight On MR Map Reference
TC Time Control m metres or miles [Derek McLean comment – there are lots of others]
What is a Road?
It is important to know exactly which features on the map are roads and which are not.
· For the purposes of a rally, any motorway (in blue), A-road (red), B-road (brown), or unclassified tarmac road (yellow) is a "coloured" road. A coloured road is almost always considered to be a road.
· Normally, each half of a dual carriageway is a separate road. This means, for example, that turning right off a dual carriageway would count as two junctions; Side Road Turn Right followed by Crossroads Straight On.
· A white is the type of road labelled as "Other road, drive or track" in the Landranger key. These aren't always white on the map; they're actually uncoloured, e.g. so one that runs through a forest will be shown in light green, but they're always called whites. Even the tiniest farm driveway shown in this manner counts as a white.
· If the clue is of the Coloured Roads Only type, this means that:
o the section of the rally that it covers does not use any whites;
o whites are to be ignored when solving that clue; you just need to imagine what the map would look like if they weren't there.
· If the clue type is All Roads then every white must be considered when solving the clue, even if there is a gate marked on the map. This doesn't necessarily mean the route will use any white roads, but they will be counted as roads in the clue. These are often harder than CRO clues since there are more roads to take account of, but with some types of clue they are easier since there is more redundant information, since if you find you've gone up a dead end, you know you've gone the wrong way – most whites are dead ends, but most yellows aren't.
· The hardest clues are of the Ignore Gated Roads type. You must squint carefully at each road to see if it is gated. Gates usually appear on whites, and occasionally on yellows (this is the only situation in which a coloured road is ignored). The Final Instructions will usually define a "gated road" as a road with a gate right at the end, so you don't have to hunt all the way along each road, but if they don't, you have to assume that a gate anywhere along the length of a road counts as it being gated.
· The corner at approx. MR 66/380708 doesn't count as a junction if the clue is CRO, but does count if the clue is AR or IGR.
· For obvious safety reasons, a rally only uses each road once (but remember that a dual carriageway counts as two roads). You should take this into account when solving a clue; once you have driven past the end of a road, that road can't be used later on as it becomes a dead end. This doesn't preclude you from using the same crossroads twice (turning left, or sometimes even right, both times) or passing over or under earlier parts of the route on bridges. The final instructions will usually make this clear.
· With a clue based on junctions, a roundabout may be given explicitly (this is usual for Novice clues), but it might be treated as a ring of T-junctions and side roads.
· If a clue is ambiguous, the correct route is usually the shortest one that complies with the instructions. There will be a statement to that effect in the SR's or Final Instructions.
· If you aren't given the map reference of the next time control, conventionally you should follow the road the last part of the clue takes you onto, carrying straight on at junctions. The only exception is if this would cause you to re-use a road.
Solving Procedure
When a slip of paper with a clue on it is thrust through the window at you, you should have a set procedure for doing it; here is a simple clue as a worked example. Get a map and try it. This piece of route is used for all the examples in the rest of this guide.
We are at TC4 on a rally, which is located at MR 458632. We are facing north-west. The time card shows we have 12 minutes to get to TC5, which we are given as 472682.
TC4-TC5 NOVICE CRO 6 miles
SRSO FL SRSO SRTR SRSO SRTL TJTR
XRTR TJTL TJTR SRTL XRTR
· As you get the clue, glance at the status line at the top of the clue to be sure it's the right one for your class; we're doing Novice in this example, so that's OK.
· Have the driver move out of the control area and pull up on the verge. Once you become more experienced, you will get the driver to drive on gently to the next relevant junction while you plot the clue, thus saving time.
· If you are given the map reference of the next control, plot it. At Novice level, you will be given most or all of them. Knowing where you're supposed to end up helps a lot when solving tricky clues; as well as acting as a check, if you get stuck you can often work the clue backwards. With practice, using the reference of the next control and considering the mileage you can guess the route even without looking at the rest of the clue.
· Carefully re-read the status line at the top of the clue; the two things you want to look for are whether the clue is CRO, AR or IGR, and what section it covers. Here it is straightforward; the clue runs from TC4 (where we are) to TC5 (the next control). A devious organiser may write "TC5-TC4" in the status line as a hint if a clue is written backwards.
· Decide what type of clue it is, i.e. what it means. Here we have a nice easy one; each group of letters is an abbreviation telling us which way to turn at a junction.
· Plot the clue on the map; this is best done as a continuous line close to the left of the roads you will use, or on both sides. Don't draw on the road itself as you will obscure it.
· A clue like this that can be read aloud is often worth handing to the driver to read to you.
· This clue plots as follows:
o SRSO – Side Road Straight On, past the junction at SH 179.
o FL – Fork Left, stay on the brown at 443644
o SRSO – Straight On, past SH 173
o SRTR – Turn onto the yellow at SH 167
o SRSO SRTL – Go up through Peastonbank
o TJTR – T-Junction Turn Left, along the valley
o XRTR – Crossroads Turn Right, down past Milton House
o TJTL – Over the bridge and into West Saltoun
o TJTR SRTL – Head north out of West Saltoun
o XRTR – Turn right onto the B6355, head SE into the control
· Once you have plotted the clue, tell the driver to move off and start giving directions.
· As you arrive at the next control, check the time on your watch and calculate the time at which you should book in, and direct the driver to wait or drive straight in as needed.
Common Types of Clues
This section shows you examples of a number of different types of clues. If you can recognize a standard clue when you see it, it will save you a lot of time. Rallies are planned with the assumption that most of the competitors will recognize most of the clues. This list is not exhaustive, and it couldn't be - rally organisers are at liberty to use anything they can dream up to define the route, so long as it can be plotted using the information on the map. Expect that on most rallies you will see at least one new type of clue, and be ready to approach it with an open mind.
All these examples are for the same section as the clue above, from TC4 at MR 458632 to TC5 at 472682. They assume you are given the location of TC5.
The clue types are not in any particular order; some are easier than others, but some people find particular types of clue easy to solve.
Junction Directions
TC4-TC5 NOVICE AR 6 miles
SRSO SRSO SRSO SRSO SRSO SRSO XRTR SRSO SRTL XRSO SRSO SRSO
SRSO SRSO TJTR SRSO XRTR TJTR TJTL SRSO XRTR SRTL SRSO XRTR
Solution: This is the same type of clue as the worked example above, but notice how many extra junctions there are when it's All Roads. Check that you can identify all these junctions on the map.
Pass Through
TC4-TC5 NOVICE CRO 6 miles
Pass in order: 437648 447672 459671 468685
Solution: Just plot the map references, then draw in a route that passes through them in the order given. There's quite a distance and a few junctions between some of them, but we just take the shortest route in each case.
Avoids
TC4-TC5 NOVICE CRO 6 miles
AVOID: 459636 442649 431653 450664 438671
448678 459675 470677 464689 477695
Solution: This is the opposite of the Pass Through clue; plot all the points, marking a little stroke across the road where the point falls on it. Then draw in a route which doesn't go through any of those marks. Notice how some of the avoids work twice, and how some roads (e.g. the one to Nether Keith) don't need an avoid as they're dead ends. Here the organiser has been nice and told us that the clue is an Avoid type; if it doesn't say, plotting the points should rapidly reveal whether it is Pass or Avoid, as it's generally impossible to plot a sensible route through a list of avoids.
Herringbone
TC4-TC5 NOVICE CRO 6 miles
 |
Solution: A herringbone defines the route rather like the strip maps of motorways found in some road atlases; the route itself is pulled out straight, and all the other roads are snipped off leaving short tails. The dot indicates that this one reads from left to right. A mark on the right of the line (below it as you're looking at it) means either "pass a side road on the right" or "turn left" depending on the context. A "vee" indicates the junction is a crossroads, and that you should turn right or left as indicated. XRSO is shown as a line across the herringbone.
Herringbones should usually be read out by the driver; this one reads: "Miss two rights, miss two lefts, miss two rights, miss a left, crossroads turn right, miss right, miss left, miss right, crossroads turn right". When reading a herringbone, always pause for the person plotting to acknowledge each instruction.
All-Roads herringbones are very long and tricky to plot but contain a lot of redundant information, which helps you to check you've done them correctly.
Grid Lines
TC4-TC5 NOVICE CRO 6 miles
Cross the following GL's in order:
64 64 45 64 44 65 44 66 67 45 67 67 46 68 47
Solution: This clue shows the grid lines the route crosses, both horizontal and vertical. Note how the B6371 wends its way back and forth across grid line 64, hence why it appears so many times. In some grid squares there will be a choice of roads; look ahead to the next part of the clue to resolve this.
If you're not told what it is, this type of clue can be recognized by the fact that it's a list of two digit numbers; there are two lists interleaved together, and successive numbers in each list change by zero or one. A final check to confirm this is that the first couple of numbers are grid lines adjacent to the square we're in.
Grid Squares
TC4-TC5 NOVICE CRO 6 miles
4563 4564 4563 4463 4464 4364 4365 4465 4466
4467 4567 4566 4567 4667 4668 4768
Solution: This is more or less the same information as a Grid Lines clue, in a slightly different form. The technique for solving it is more or less identical.
This type of clue can be recognized by the four digit numbers, and the same checks as described for Grid Lines.
[Variation of above: 4563 +1 –1 –100 +1 –100 +1 +100 +1 +1 +100 –1 +1 +100 +1 +100]
Box ticks
TC4-TC5 NOVICE CRO 6 miles
Solution: Each box represents a grid square and shows the points at which the route enters and leaves it. The dots represent the two time controls.
OXO Grid
TC4-TC5 NOVICE CRO 6 miles
O O O X X
O X X X O
O X X O O
X X O O O
X X X O O
Solution: The route passes through every square marked with an X, but none of the squares marked with an O. Once you have plotted TC5 the alignment of the grid becomes evident - the bottom left corner is GS 4363. Most of the route is obvious with this type of clue, but it will take a bit of trial and error to see how to use all four of the squares 4466, 4467, 4566, 4567.
Road Tracings
TC4-TC5 NOVICE CRO 6 miles
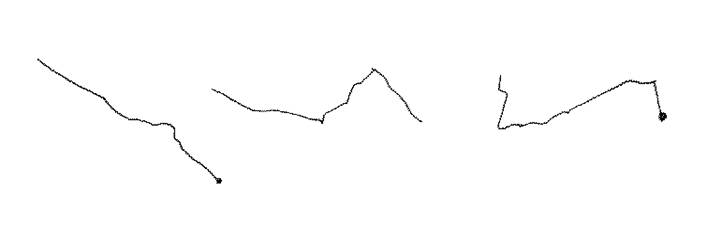
Solution: Each line is a section of the route. It can be surprisingly difficult to match tracings to roads as they are often indistinct, but remember that all the pieces together exactly fit the route, so the lengths can be as informative as the shapes. Transcribing the clue on to tracing paper or acetate is a good idea - don't try it with this one though, as the chances are that it won't be printed to scale. [It may even be distorted in shape.]
Tulips
TC4-TC5 NOVICE CRO 6 miles
Solution: Each tulip represents a junction or group of junctions; enter on the road with the ball and leave on the one with the arrow.
Compass Directions
TC4-TC5 NOVICE CRO 6 miles
NW WNW WNW NE NNE NW ENE SSE NE E NNE SE
Solution: These just give the compass direction in which to depart from each junction. If you're not familiar with the points of the compass, get a romer with a compass rose printed on it!
Clock Times
TC4-TC5 NOVICE CRO 6 miles
Enter on the hour, leave on the minute:
5:55 5:50 4:50 4:10 8:05 7:55 6:15 8:25
11:05 6:15 9:00 7:25
Solution: Each time represents a junction. Imagine the position of the hour and minute hands of an analogue watch at the time shown; you come into the junction along the road at the angle of the hour hand, and leave on the minute hand.
This type of clue is usually labelled explicitly at Novice level, but if it isn't, it can be recognized by the pattern of the numbers. If one that isn't labelled doesn't seem to work, try it the other way, i.e. "Enter on the minute, leave on the hour"
Spot Heights
TC4-TC5 NOVICE CRO 6 miles
179 173 167 159 133 87 101
Solution: Pass through the spot heights in order; just hunt around for the spot heights on the map. With clues that list map features, absence is as important as presence; the lack of a spot height in the list tells you not to go down a road that it's on.
This clue can be recognized as a list of seemingly random 2 or 3 digit numbers; if you think a clue is based on spot heights, look around for the numbers in that part of the map.
Mixed Features
TC4-TC5 NOVICE CRO 6 miles
Bridge Phone ETL Bridge Phone TJTR SRTL XRTR
Cross GL 44 before GL 65.
Solution: Just look for the next feature ahead as you plot. Familiarity with the map key helps with this type of clue.
Coloured Junctions
TC4-TC5 NOVICE CRO 6 miles
BYB BYB BYB BBY YYY YYY YYY YYYY YYY YYY YYY YBYB
Solution: The letters are the colours of all the pieces of road that meet at each junction. By an unwritten convention, the first letter in each group is the colour you enter on, and the last is the one you leave on. This clue gets a bit tricky in the middle with all the YYY junctions; the key thing here is the crossroads, denoted YYYY. There are three junctions between turning off the B6371 and the crossroads, and only the route past the distillery fits. Then there are three more between that and the crossroads with the B6355; going straight into West Saltoun doesn't use enough junctions, which tells us to detour past Milton House.
This type of clue is very easy to recognize; it is also one that is easier when it is "All Roads" as there are a lot of extraneous "YWY" junctions, which serve to disambiguate the route. [Dave always was a terminological show-off!]
Mixed Criteria
TC4-TC5 NOVICE CRO 6 miles
Pass two public telephones, and turn right at two crossroads.
Avoid 172.
Solution: These can vary from quite easy to quite nasty, depending on the organiser's ingenuity. The conditions are for the whole section and don't necessarily apply in order. The 172 is fairly obvious and takes us around through SH 167. By looking at the mileage (6 miles is about 10 km) we can see that the only phone boxes in striking distance are at 444666 and 461674; the one at 414669 takes us too far away. The only two coloured road crossroads in the area are at 451673 and 468685; junction at 434650 doesn't count as a crossroads, since one of the roads is white. We have to end up at TC5, so to turn right at 468685 we must have come from West Saltoun. There are two ways we can turn right at 451673 to get to West Saltoun; we have to come into the crossroads from the west and head south, otherwise we miss the phone box at Peastonbank.
Spot Height Total
TC4-TC5 EXPERT CRO 6 miles
Pass through spot heights totalling 999m
Solution: This clue is a "ringer" - no organiser would give out such a hard a spot height total clue on such a short section. At least, they wouldn't give it out as a Novice clue - did you notice the class in the clue heading?
The only way to do this type of clue is by trial and error, with lots of calculator bashing. The two approaches are to try a variety of routes and add up their spot heights, or to just try random combinations of spot heights until you get a match. For roads like this with lots of spot heights, the first approach is the one to use.
You can use numerical tricks to cut down the work, e.g. when trying routes, add up the last (units) digits of the spot height, and see if the last digit of the answer is the same as the last digit of the required total.
Contour Lines
TC4-TC5 NOVICE CRO 6 miles
180 180 SH 170 160 150 140 130 130 140 150
160 170 170 170 SH 170 SH 160 SH 150 140
130 120 120 130 SH 130 120 110 100 100 100
90 SH 90 100 100 100 SH 110
Solution: Contour lines clues are quite difficult to plot accurately as they often impossible to see in the car; often the best way is to try to guess the route off the spots heights and general topography of the area. You can then use the contour lines as a check and to disambiguate the route if need be. This clue has the locations of spot heights marked in with "SH" to disambiguate it, but the organisers may also have been hinting at the easy way to solve it. Be wary of clues which contain too much information rather than too little, and be prepared for a bit of lateral thinking.
Contour Line clues are easy to recognize as a long list of numbers which rises and falls in multiples of 10.
[Variation of above: 180 +10 –10 –10 –6 –4 etc. +10 would be 190, –10 180, –10 again 170, –6 would indicate a SH, etc. This is a hypothetical case, and doesn’t represent any particular bit of the map.]
Constructions
TC4-TC5 NOVICE CRO 6 miles
Tyne Water joins Birns Water at Pt. A, near Pencaitland.
Pt. B is SH 209 where a B road meets the A68(T).
Cross the line AB four times, then enter the control from the NW.
Take the second shortest route complying with the above.
Solution: The tricky bit with these clues is finding the points, since you're almost never given them directly and have to hunt for them. If you trace along the rivers near Pencaitland and find their names, you'll see that Tyne Water runs south of Ormiston and down through Pencaitland, and joins Birns water at 455688. A quick scan down the A68 reveals two SH 209's, the one at a junction is 421617. When we draw the line, it crosses coloured roads in seven places; the only way we can cross it four times within the mileage is via 436648, 438652, 444665 and 447672. Note that since we cross it an even number of times, we end up back on the same side of it. This gets us as far as the crossroads at 451673. We have been told to the control from the NW, which would take us along to West Saltoun via SH 104 and 84, then up to the B6355. To change the route to be the second shortest, we want to introduce the smallest possible addition in length; we cannot change the first part of the route, so the only possibility is to miss out the road with 104 and 84 and use the bridge at SH 87 instead.
Some Other Types
Here are short descriptions of some other types of clue you may encounter.
· Names - a list of names of farms or villages that you pass on the route.
· Feature Tracings - these usually take the form of a clue laid out like a Box Ticks one, but where the boxes contain tracings of a particular type of feature. Often, this feature is wooded areas (green on the map) or water (blue). Another variety is a single distinctive feature from the map, which you must pass.
· Writing on the Road - this clue can be recognized as a jumble of meaningless letters, often in lowercase. In crowded places on the map, the cartographer is unable to avoid placing a town name or other word on top of the road. The clue consists of the letters that actually fall on the roads used.
· The Everything Clue - a huge list of numbers and symbols, with grid lines, road numbers, contours, spot heights, etc. It is designed to confuse you and slow you down, but just get the driver to read it and breeze through the plotting fairly quickly, as there will be a lot of redundant information.
· The Time Waster - this is a clue where there is no clue to solve at all, and the correct route is the shortest route to the next control. Plotting the next control and looking at the mileage given in the status line will alert you to this possibility before you even look at the clue. Time Wasters usually take the form of a long "shaggy dog" story or riddle with a hint at the bottom that you've been wasting your time.
· Pace Notes - this is a description of the route, written in the style of road reading, or of stage rally pace notes. Just read it out to the driver, while keeping an eye on where you are on the map and plotting the route as you go.
Coding and Variations
It isn't easy to think up a completely original clue and make the level of difficulty just right, so it is common practice to take one of the basic clue types and make it more difficult. Don't worry, this is rarely done for Novice level clues, but is seen frequently in higher classes.
If you come across a coded clue, and the code is not obvious, then look at the general pattern to see if it is similar to a type of clue that you know, and the combination of this insight and comparing the clue to the surrounding area on the map will help you to break the code.
Letters and Numbers
Codes that give letters as numbers or numbers as letters are very common. These are usually picked so that A=1 or A=0, e.g. "24 18 19 15 20 10 20 18" might be code for "XRSO TJTR". Alternatively, numbers can be coded as letters, e.g. "BD FB Y FB BF" might be the Grid Lines clue "24 62 25 62 26"
Code Word
This is commonly used for coding numerical clues as letters. The code word is a ten letter word with no repeated letters, e.g. BADENSCOTH. It might be a name on the map, or it might be a nonsense word. Each letter represents a digit from 0-9, e.g. B=0, A=1, D=2, ..., H=9. This can be very frustrating if you don't realise it and try to decode it as a straightforward letters and numbers code. In this code, the grid lines "24 62 25 62 26" become "DN CD DS CD DC".
Roman Numerals
Roman numerals are sometimes used, in a straightforward fashion. If you don't know how they work, it's worth learning. These are often found as a way of encoding a Clock Times clue.
Changing Order
If there is a clue with elements laid out in rows, e.g. Box Ticks, and it doesn't seem to work, it may be that the order is different. Try patterns such as reading right to left, top to bottom or in alternate zig zags.
Complex Herringbones
Herringbone clues lend themselves to lots of devious complications. The simplest variation is to take off the ball or arrow, so you don't know which end it starts from, though a lot of organisers miss them out without any intent to deceive, so it's a good idea to try starting from the left first. The next stage is to split a long herringbone into a number of strips so you have to find the order in which they work by trial and error. More difficult still is a herringbone bent round in a circle, so you don't know where the ends are supposed to be.
Running Things Together
This is one way to make a clue a little more obscure. You are presented with an unbroken stream of letters or digits, and this can often make it hard to see right away what kind of clue it is. This trick is quite common with Coloured Junctions clues - a long string of "YYYYYYWYYYYYWWYY..." can be very difficult to pick apart, but note that the breaks always occur between two letters which are the same, since roads rarely change colour except at junctions.
Arithmetic
A clue based on numbers, e.g. Spot Heights, can be disguised by performing some form of arithmetic on it. Consider the spot height clue from above "179 173 167 159 133 87 101"; this might be encoded by any number of means - as you can see from the examples, they can be quite inscrutable if you don't know what they are!
· Digits Added: 17 11 14 15 7 15 2
· Differences: 179 -6 -6 -8 -26 -46 +14
· Running Total: 179 352 519 678 811 898 999
· Digits Multiplied: 63 21 42 45 9 56 0
Missing Elements
Some clues can be made harder by leaving out part of the information, e.g. leaving the arrows off of tulip diagrams. This is usually done with pictorial clues, but is occasionally done with other forms, e.g. only giving the horizontal grid lines in a Grid Lines clue.
Numbers as Town or Map Names
Canterbury, Swindon, Chelmsford, Swansea, North East Norfolk, Hexham, Scarborough
This code is very puzzling the first time you come across it; it is most often used with Spot Heights. Each name represents a number, and they are the numbers of the Landranger series maps, as shown on the back or inside of the purple cover. This clue is in fact the same Spot Height clue as in the Arithmetic examples above.
Hints or Contradictions on Earlier Clues
A trick used to catch the unwary is to put a piece of vital information on one of the earlier clues, e.g. you get a clue at TC2 which has a message at the bottom "TC4-TC5: Avoid 172". It is easy to forget this by the time you get to TC4 (road rallies are exciting!) so note it down somewhere you will see it.
Ambiguous Clues
Occasionally organisers give out a clue that is deliberately ambiguous. Usually, you have to resolve any ambiguity by taking the shortest route that fits the clue, but follow whatever rule is stated in the Final Instructions. This trick is often used where two larger roads come to a junction, and there is a shortcut down a little piece of white road, in the expectation that unwary competitors will overlook the white.
Timekeeping
Getting the timing right is perhaps the most difficult part of doing a rally of any type. Following a real route while staying on the correct time schedule, rather than just going for raw speed within the confines of a racing circuit, is the central feature which distinguishes rallying from other forms of motorsport.
When competing on a rally, you should always be aware of your time situation, so you know exactly what time to book into each time control. If possible, the driver should mentally keep track of Due Time and Lateness (see below) and be able to confirm the navigator's calculations.
If you see that you are going to arrive at a time control significantly before the time you want, then have the driver pull in to the side of the road just before the control board and wait; drive up to the marshal just before the time you want to book in at. Roll down the window and ask for the time you want, e.g. if you want 20:36 then say "Thirty-six please". If you are just going to make it, or miss by a few seconds, tell the driver to "go straight in" as you approach the control, and ask for the time you want - but don't always expect to get it! If you're going to be late, say something like "Earliest time please" in as doleful a manner as possible and rely on the marshal's sympathy.
In principle, all the marshals' watches (and yours) should be synchronised to the second with "rally time", but often they're not. If you don't get the time you want when you do deserve it, it is rarely worth complaining, just accept it as fate. In most events, the results at Novice and Experienced level are rarely affected by the odd time penalty.
Terminology
The following sections describe timekeeping for what is known as "Scheduled Timing"; the idea is that the organisers lay down a schedule for each car at the start, and you have to try to stick to it. This is the form of timing that is almost always used on road rallies. The basic idea of road rally timekeeping can be summarised like this:
· All timing is done in whole minutes, and times are rounded down, ignoring the "seconds" displayed on the watch, i.e. both 22:45:01 and 22:45:58 are considered as 22:45
· Cars start one minute apart, according to car number, with the more experienced competitors having lower numbers and going off first.
· You try to book into the time controls in order, usually following a pre-defined schedule, usually set at 30 mph.
· If you end up running late, you aim to stay running the same amount late, rather than racing to catch up. The organisers will try to make things interesting enough so that catching up is not an option!
The MSA "blue book" regulations define a vast array of terminology for timekeeping; as a road rally competitor, there are only a few concepts to be aware of:
· Rally Time - rallies are not timed with stopwatches, they run on normal time in the 24 hour clock. To allow precise timing, all marshals and competitors synchronise watches to an agreed time. When you sign on at the start, there will be a watch with rally time on display - set yours to match it, exactly to the second.
· Scheduled Time - your Scheduled Time at a given time control is the time you would book in there if not running late. Scheduled Time is predetermined by the organisers; either it will be printed on your time card, or you will have to keep track of it as you go, calculating it from the time you started and the number of minutes allowed for each section. Since cars start one minute apart, this is different for each competitor.
· Due Time - your Due Time at the next time control is the time you should try to book into it, in order to avoid being penalised. This includes any previous Lateness you may have accumulated, i.e. if you were running 7 minutes late when you booked into TC4, and your original Scheduled Time at TC5 was 22:38, your Due Time at TC5 is 22:45.
· Lateness - your Lateness is how far behind Scheduled Time you are running, expressed as a number of minutes, e.g. "We were on 7 minutes Lateness when we booked into TC4". Lateness is just the difference between Due Time and Scheduled Time. If you arrive later than you intended at a time control, and hence book into it after your Due Time, your Lateness increases.
· OTL - There is a limit to how much Lateness you are allowed to accumulate; after all, the organisers want to finish the rally, publish the results and get to bed! This limit is usually 30 minutes. If you have more than 30 minutes Lateness, you are OTL (Outside Total Lateness). If you book into a time control so late that you're OTL, it doesn't count, just as if you never visited it at all. To count as having finished the rally, you are required to visit a minimum number of time controls, and there are also certain time controls which you must visit. You should take the measures described below as necessary to avoid being OTL.
How to Avoid Becoming OTL
If you are on a difficult rally, and your lateness has built up to over 20 minutes, you need to consider taking one or more of the measures below to reduce it. This is a matter of judgement, since all of them cost you penalties and affect your score. They are listed in order of how drastic they are, with the mildest first, but you should familiarise yourself with the scoring system so you can estimate number of penalties each one is likely to incur.
· Making Up Time - with a bit of practice, you will manage to do some rally sections in less than the specified amount of time. If you need to reduce your lateness, you can book into a time control ahead of your Due Time, instead of waiting outside. This is known as "Making Up" or "Pulling Back" time, and is subject to the Three-Quarters Rule described below.
· Cutting Some Route - if you are running late and you're not able to make up time by arriving early, you might consider missing out a bit of the route. If there are two time controls which are only physically a couple of miles apart by road, but the rally route between them is quite contorted and much longer, you should be able to make up quite a lot of time by going straight to the next time control. You risk missing all the code boards, as well as arriving at the next control in the wrong direction. If you have to do this, it is much better if you can at least partly solve the clue first and work out what the correct route might be; this will allow you to work out what way to approach the next control, and decide where the code boards might be, and how many you will miss. Usually, the organisers use the minimum number of code boards required to satisfy the condition that someone who makes a navigational mistake misses at least one, but they are at liberty to place them anywhere. Remember, the Three-Quarter Rule applies to this too.
· Cutting Controls - if you are really desperate, it is possible to skip one or more time controls and still have a chance of finishing the rally; it is always important to finish the rally if at all possible, no matter how huge your penalties, since you need to get a technical finish to get the championship points, and you don't know how badly everyone else might have done. By going straight to a later control you can potentially pull back a large amount of time and make a fresh start, but this is very much a method of last resort, as you will be penalised not only for the time controls you missed but all the code boards too. In this case, the Three-Quarter Rule doesn't apply, but be sure to work out what time you need to book in at the control you have cut to, as you don't want to be early (i.e. ahead of Scheduled Time and on negative Lateness).
The Three-Quarter Rule
You are allowed to make up time, although in some events you are penalised for it. There is a limit to how much time you can make up, and this is specified by the Three-Quarter Rule. On any section of 9 minutes or longer between two time controls, you cannot take less than three-quarters of the specified time, rounded down to the next whole minute, i.e.
Scheduled Length of Section Minimum Time to Be Taken
9 minutes 6 minutes
10 " 7 "
11 " 8 "
12 " 9 "
13 " 9 " etc.
The rule does not apply to sections of 4 miles or less.
The idea behind this rule is that if you are breaking it, the chances are that you are speeding or driving dangerously, and likely to bring the sport into disrepute. The penalty for breaking this rule is usually severe - RACMSA regulations specify a minimum of 30 penalties for a first offence, and exclusion (disqualification) for a subsequent one; the SR's for the event may be more strict. So don't do it!
Time Cards
As you begin the rally on your start time, you will be given a time card and a clue for the first section. The time card will be signed by the marshal at each time control, and collected at the last control, or sometimes at an intermediate point. There is also a space on the line for each section where you should write down the code boards. If there is a Passage Control, the marshal will initial one of the code board spaces on your card. The time card will also usually list the map references of the time controls which you are being given, but sometimes these are issued on a separate slip of paper. You may receive Panic Envelopes instead; see "Road Rallying in England and Wales" (below) for an explanation of the panic envelope system.
There are two formats of time card commonly used - the easier type to deal with is printed individually for each competitor and shows your Scheduled Time for each control, e.g.
Car 17 - F. Bloggs / A. N. Other - Novice - Start 20:17
Control MR Scheduled Actual Dirn. Official Codes
Time Time
Start 265707 20:17
TC1 260698 20:23
TC2 20:30
TC3 262626 20:41
The columns "Actual Time", "Dirn.", and "Official" will be used by the marshal at each control for filling in the time you get there, whether or not you arrived in the correct direction (tick or the letters "WD"), and their signature. The "Codes" column is for you to record code boards or obtain Passage Control signatures. Here, we have been given the map references for TC1 and TC3, but not TC2.
With this type of card, you can see easily what your Lateness is at any point - just take the difference between the Scheduled Time and Actual Time at the previous control. You can work out your Due Time at the next control by adding this Lateness to the Scheduled Time for that control.
The other type of time card just gives the number of minutes for each section:
Car 17 - F. Bloggs / A. N. Other - Novice - Start 20:17
Control MR Section Actual Dirn. Official Codes
Length Time
Start 265707 -
TC1 260698 6
TC2 7
TC3 262626 11
With this type of time card, it is vital to keep track of your times. As you leave each control, pencil in your lateness somewhere on the time card, e.g. down the right hand side or in the section length box. As you arrive at the next control, add the Section Length shown to the Actual Time you got at the previous control to work out your Due Time. Use the Lateness you've been keeping track of to decide if you need to make up time. The organisers sometimes leave a blank column, which you can use to work out your Scheduled Times and write them in if you have a spare moment.
Miscellaneous Points
· Booking in OTL - if you arrive at a control OTL, it is worth stopping anyway in order to get the clue, so you can try to get some or all of the code boards on the next section, if you think you can make up enough time to avoid the need to cut a control.
· Making Up Time - on most rallies, they don't penalise you for making up time, provided you don't break the Three-Quarter Rule. The idea is that after dropping some time, you can get away without further penalty from lower placed crews who might otherwise just "take a tow" and follow you for the rest of the night. However, on some events making up time is penalised, and it becomes a matter of judgement how much time to take back, and when. It is wise to ask what the local practice is at Signing On, as they often fail to mention it in SR's.
· Halfway Halts - some longer events have a break in the middle, where you can obtain fuel and relax briefly before going at it again with renewed vigour. The usual practice is to scrub all Lateness at the halfway halt, and have each car restart on Scheduled Time. The advantage is that it gives you a fresh start for the second half of the rally; the disadvantage is that if you were very late at the end of the first half, you may only just have time to get some petrol and chocolate, then have to zoom out again.
Target Timing
The alternative to Scheduled Timing is Target Timing; if a rally is run to the latter system, then each section merely has a target length (in minutes) which you have to aim to achieve. There is no notion of being OTL in a target timed event.
Scoring and Penalties
The scoring for road rallies is fairly simple; the penalties are added up according to the list below, and the lowest score wins the class. It is helpful to have an idea of how these work out if you have to make a tactical decision. The table of penalties listed below are the ones normally used on Scottish road rallies, but it may differ from event to event.
Item Penalties
Arriving later than Due Time at a TC 1 per minute
Booking in before Scheduled Time 2 per minute *
Missing a Code Board 15 **
Arriving at a TC in the Wrong Direction 15 **
Failing to visit a TC 30
Minor infringement, e.g. failing to stop
at a Give Way 30
Major infringement, e.g. speeding Exclusion
* At some events, this is changed to "before Due Time" so that making
up time is penalised.
** This is not the penalty given in the blue book, but is usually
specified in the SR's instead. If it isn't, then technically the
blue book one must be used, which is 30 penalties.
· Exclusion is the equivalent of disqualification, and you get no championship points at all.
· To count as having finished the rally, you have to visit a certain number of time controls, normally around two-thirds. If you do not, you are classified "DNF" (Did Not Finish) instead of a score.
· There are certain controls that you must visit, normally the start, finish, and any point at which time cards are to be collected. If you fail to visit one, you are classified "FTF". If you visit the minimum number of controls, but are OTL at one of these mandatory controls, you are classified "OTL" instead of a score and are not considered to have finished.
· If there is a tie, the result is decided on a "furthest cleanest" basis, which means the competitor who got further in the rally before incurring as many penalties as the other is placed higher.
Reading the Road
Reading the road is the skill of predicting the corners ahead and general topography from looking at the map. Road reading should combine with the directions the navigator gives to the driver to provide a steady stream of verbal information to help the driver make progress. A driver should not "trust" the information offered about the severity of corners, etc. but should only use it to help with their own perception of the hazards ahead. Good road reading aids concentration for both crew members, making you both more competitive, and makes the rally more enjoyable.
A driver should go just slow enough so that if the navigator calls a corner completely incorrectly, or some other hazard is encountered, there may be a nervous "moment" but there should not be a crash. Do not treat road reading like pace notes; you are not on a stage rally, you are on a public road. The map may be inaccurate, the navigator may have made a mistake, there may be an oncoming car or pedestrians.
A crew needs to agree on a system of road reading, and practice it, so that both members know precisely what each word means in any context. You have to call out road reading quickly and fluently; if you call a bend after the driver starts to brake, you've wasted your time. It does not matter if your road reading isn't exactly correct when measured with a ruler and protractor; it is more important for it to be consistent, so the driver learns exactly what to expect when you say "two hundred, sixty left into ninety right". It is strongly suggested that you start with the system below, and add a few changes as your experience grows. This system is used by many navigators and drivers, so will be transferable if you go road rallying with a different partner. A good rule to maintain is that no word should have more than one meaning or be used in two different contexts.
When reading the road, don't stare at the map, but be continually looking up and glancing out of the car. This helps you confirm your place on the map and keeps you from becoming car sick.
Corners
A bend or corner is expressed as the angle in degrees through which the road turns on the map, followed by the word left or right. Use the following scale of severity:
· slight or ten
· twenty
· thirty
· forty-five
· sixty
· seventy-five
· ninety (a right angle)
· tighter than ninety (up to 120 degrees)
· hairpin (anything over 120 degrees)
Example: "30 left"
This can be enhanced by describing the radius of the bend shown on the map; prefix it with an adjective on this scale:
· sharp or box - there is a sharp, distinct angle on the map. This will be a tight, blind bend on the road.
· (nothing) - an average corner, radius 1-2 mm on the map.
· medium - a bit more generous curve, 2-3 mm
· open or long - a long, smooth sweeping curve that fills a good part of a grid square.
Example: "box 90 right"
Junctions
· Describe the shape and type of the junction as it will appear to the driver.
· If you think you might have to give way, call it.
· Ignore the colours of roads; the driver can't see the map. e.g. if you come down a yellow to a T-junction where you'll turn left onto another yellow, and there is a farm driveway (white) straight on, call it as "crossroads, give way, turn left"
· Use the following nomenclature: side road, T-junction, crossroads, fork, turn left, turn right, straight on, give way
Example: "side road turn left" It is very helpful if you use information on the map which you can compare with the view out of the windscreen to guide the driver in locating a junction with side roads or cross roads, e.g. "side road right, between the buildings" or "fork left, follow the Saab"
Straights
A straight is merely a length of straight road between two corners, junctions or other features. This is a more relaxing bit where you can afford to breathe and perhaps make a humorous comment, if the straight is long, and where the driver can floor it!
· Just before the braking point for a corner, call (or repeat) the corner and describe the following straight or corner.
· As the car takes the corner, repeat the straight that follows it, and call the next corner as well.
· Estimate the length of the straight to the nearest hundred metres, using the map grid as a guide. Remember, a grid square is 1000m along a side, but 1400m corner to corner.
· Don't call to the nearest 50m; save the words for tens and units to describe the severity of corners. If the distance shown is about 150m (3mm) then call it as "one hundred" but if it is 100m or less between two corners or junctions, call them both together separated by the word "into".
· On straights of 400m or so, repeat the corner or junction as you come to it.
· On long straights, compare features on the map with what you can see to help you reckon the distance to the next junction or corner, and provide a countdown of the form "five hundred ... three hundred ...". The driver is likely to build up a lot of speed on these straights and the countdown will help them to judge when to start braking.
Examples: "300, 30 left", "60 left into 30 right"
Features
You should call any features off the map that represent hazards. The principal ones are:
· Bridge - should be called for all bridges marked on the map, whether the road goes under or over them. The road is often a lot narrower at this point, and any bends immediately before or after the bridge are typically tighter than those shown on the map. Where there is a bridge with two bends before and after it, call them all as one, e.g. "30 right over bridge into 60 left"
Call bridge or possible bridge wherever a stream or burn passes under the road without a bridge being marked.
· Ford - when water passes over the road. There are usually, but not always, road signs to confirm a ford ahead.
· Steep Hills - call these if there is a 1 in 7 or steeper arrow on the road.
If the rally takes you up a road with a gate or cattle grid marked, warn the driver well in advance. If you have the route correct, it will be a cattle grid or open gate, but if not there is the possibility of a closed gate in your path.
If you have time, call other features off the map which will help the driver pick out hazards, corners and junctions, e.g. "90 right, just in front of those trees"
Once you get more confident, it's worth trying to call some of the road topography from the contour lines and spot heights, e.g. a spot height in the middle of a straight road is often associated with a crest.
Descriptive Reading
Road reading works best in short, sharp words which describe individual corners or hazards. Sometimes though, the road on the map is a bit indistinct. If this is the case, warn the driver that you are not reading properly, and describe what you can, e.g. "the road bends round to the right over about 800, then there's a tight 90 left". This is more useful than nothing.
An Example Section
The paragraphs below are a complete sequence of road reading for the example section from 458632 to 472682. Compare it with your map; there is perhaps more information than you might at first realise, but it is all there! Pace notes for a stage rally, prepared by travelling the route several times beforehand, are two or three times more detailed than the best road reading. An ellipsis "..." indicates a pause in the reading. Most repetitions have been left out. Numbers in square brackets "[n]" indicate notes below.
"OK, drive on ... 200 slight left ... 200 30 left into 60 right over bridge into 60 left ... into medium 45 left ... into 90 right, 20 left into slight right into 45 left into 60 right [1] ... 100 20 left ... 100 30 right ... 200 45 left ... 400 20 right ... 200 [2] ... 20 right, 700 side road right in front of building ... side road right here. 100 slight right ... 500 medium 20 left ... long 45 left over about 400 [3] then 45 right ... 100 slight left into slight right, slight left ... 300 20 right, side road left behind the trees. 200 sharp 45 right ... 300 60 left between buildings [4] ... 300 60 right possible bridge, 100 45 left ... 200 T-junction right. 20 left, 100 30 right ... 100 30 left ... 200 30 right ... 200 30 left ... 200 crossroads right. 200 90 left ... 200 90 right [5] ... 200 slight right ... 200 30 left into T-junction left. 100 20 right, possible bridge, then [6] big bridge into 45 left ... 100 60 right ... 200 60 left ... [7] 200 slight right into T-junction right. T-junction right, immediate side road left. 20 right, straight for 1000, then slight right ... 500 [8] ... slight right 100 45 right ... 100 45 left ... 100 crossroads, give way, turn right [9]. 400 to the control, it's 36 now, we want 37, go straight in."
· [1] A bit indistinct, but this sequence is a fair call of it.
· [2] Use the yellow to Windy Mains as a countdown; a bit of overkill at this distance.
· [3] Better than trying to fix an apex for a more precise corner
· [4] In this case we don't call a crossroads; they'll be two driveways for the farm buildings.
· [5] We clearly have right of way, so call it as a corner and not a T-Junction. In cases of doubt though, always call the junction.
· [6] Make the point that there's two. The size of the river on the map tells us the marked bridge is a big one; in reality this one happens to be a huge monster of a yump that will break your car if you take it at over 30 mph, but you'd see that before you called it anyway.
· [7] At this point we come into 30 limit (tell by the road signs, not the map!) Road reading in a Quiet Zone is a bit over-zealous; concentrate on not getting lost, as towns can be tricky.
· [8] Countdown using the trees.
· [9] The last sequence errs a bit on the cautious side, but you would be coming into the slight right at quite a speed, and it's wise to allow a little for it. Always be pessimistic with reading on A-roads.
![]()
Paperwork
There are a number of documents you will need, and a number of bits of paper that the rally organisers will send or give you.
Insurance
Normal car insurance does not cover you for a rally. A few companies will specially extend their policies to cover motor sport, but the best option is to get separate rally insurance through the Bowring or Alexander Forbes schemes. These allow you to buy insurance for each rally individually, from the organisers on the night, for a small premium - about £8 per event.
To use the Bowring scheme, you must apply through the club for an authorisation letter from Bowring, at least three weeks before the first rally you intend to compete on. This letter must be shown to the rally organiser when you sign on for Bowring insurance, to prove to them that Bowring have accepted you for the scheme.
Since Bowring letters are free, you should apply as soon as possible whether you have a particular rally in mind or not, and even if you don't have a car or don't intend to compete in it. You can list more than one car, so list any cars you might reasonably be able to borrow (parent's, brother's, sister's, friend's) as well as your own. The key thing is to get the initial approval - Bowring don't care what car you use, and adding another car to your authorisation can be done in a couple of days with a quick letter.
The Forbes scheme is more flexible, allowing you to sign on the scheme on the night provided you have a reasonable driving record. If not, you can apply for an approval letter in a similar way to the Bowring scheme. Forbes will also honour Bowring letters. The Forbes scheme is the more convenient to use, but it's still worth getting a Bowring letter as it is up to the organisers of each event which of the two insurance companies they use, or if they offer both.
Both these schemes are Third Party Only, so be careful out there!
Licences
To compete in any rally except club 12-car events, you need a licence from the MSA; a driver and navigator must each hold at least the minimum class of licence required for the event. A Clubman licence costs around £10 per year. A National B licence, the same class as required for stage rallying, is currently needed for regional championship events (this policy is under review); it costs around £30 per year. Licenses can be applied for on the day of an event.
Supplementary Regulations
These give details of a particular event, and are sent out with entry forms about three weeks prior to the event. If you are registered for a road rally championship, you will usually receive a personal copy by post; if not, ask at a club pub night or phone a committee member to get a copy. SR's give details of who to send your entry to, the entry deadline, what maps you will need, when and where to report for the start of the rally, etc. Peruse them carefully for any rules that look unfamiliar; if in doubt, ask an experienced club member for advice.
There will be a list of times, like this:
· Scrutineering starts at 18:00
· Any competitor not signed on by 19:30 may be excluded
· First car starts at 20:01
Aim to turn up at a rally for the start of scrutineering, and get your car through early; if there are any minor things the scrutineer asks you to fix, you will have plenty of time. Get signed on early, so you get a chance to look over any start instructions carefully and do any required plotting. Take time then to relax and chat before you start the rally itself.
Final Instructions
These are usually sent out to navigators a couple of days prior to the event, but sometimes they are issued late at the start of the rally. They will contain details about the start and running of the event, amendments to the SR's, a list of abbreviations such as CRO and SRTL, and often an entry list. You will be told your car number.
Start Instructions
These are a supplement to Final Instructions, given out at some events when you sign on at the start of the rally. These sometimes contain information to be plotted on the map, such as "black spot" grid squares to be avoided, and junctions where you must give way. It is always worth plotting these carefully while you are waiting to start.
Results
At the end of the rally, the organisers will make a paper spreadsheet of everyone's penalties, and announce Provisional Results. Once these have been finalised, you will receive a copy of Final Results by post a few days after the event.
Preparing for an Event
There are a number of things you should do in the run up to a rally; this schedule is a typical example assuming a rally where scrutineering starts at 6 pm on Saturday in Aberdeen.
· The week before - fill in your entry form and send it off with a cheque. It's worth phoning the Secretary of the Meeting to check that the rally is going ahead and to inform them that you will be entering, in case your entry gets lost in the post.
· Wednesday night - Check over the car and ensure it will pass scrutineering; make sure there are no mechanical gremlins lurking. If you haven't been rallying for a while, go out for a short drive of 20 to 25 miles on local roads as a crew, with the navigator reading the road from a pre-chosen route, to get back into the swing of things and shake down the car.
· Thursday night - Buy and prepare the maps. [I reckon this should be done long before now – Derek.]
· Friday - if you don't get final instructions in Friday's mail, phone the organisers to find out any details you need to know and confirm your entry has been accepted. Make a checklist of things you'll need to take with you.
· Saturday lunchtime - have a hearty meal to set you up for the night ahead.
· 2 pm - get together with your team-mate and check that you have all your documents and everything you might need, such as warm clothing and chocolate, as well as rally requisites like maps and a warning triangle.
· 2.45 pm - after a final check, leave early with plenty of time to get to the start, and have a relaxed drive up - there's plenty of time to rip tarmac later in the evening!
· 6.05 pm - queue up for scrutineering, get a pass ticket for the car and go to sign on for the rally. Be sure to set your watch to rally time. Go back to the car, and check through the signing on pack for anything you need to plot or look over. Go and fill up with petrol.
· 7.50 pm - get settled in the car, set out your equipment, fold maps to the right place for the start, etc. A few minutes before your start time, queue up at the start control with the engine running.
Etiquette
Road rallying is a very friendly sport. Being keen and competitive is fine, but don't get carried away; this isn't Formula One. On top of normal good sportsmanship, there are a few points of rally etiquette you should adhere to:
· If you are holding up a faster competitor on the road, let them past at the first reasonable opportunity, e.g. a junction, tight corner or long straight. If they are not in your class, you have nothing to gain by holding them up; if they are your competitors, it is just unsporting.
· Don't follow someone with main beam lights and spots on; it's very disconcerting for the driver in front. If you are behind someone and you feel they are holding you up, wait a moment for them to take an opportunity to let you past. If they haven't seen you after thirty seconds or so, give a brief and polite flash. Remember that it is a lot easier to follow someone else's brake lights at a given speed than to maintain that speed when you're in front; allow for this when deciding if you really need to get past someone. Don't be surprised when someone lets you past, only to sit on your tail for the rest of the section!
· Accidents on road rallies are quite rare, and injuries fortunately even more so. However, if you see another competitor stopped beside the road or in a ditch, you MUST stop at least long enough to ensure that they are uninjured. If they are OK but need help getting the car back on the road, or need a push to start it, it is considered sporting to sacrifice a couple of minutes to help - this rarely affects the outcome of the rally and allows them to continue enjoying the evening too. If their car is unable to continue, they will inevitably wave you on and tell you to enjoy your rally. Mark the spot where you passed them on the map and inform the marshal at the next time control.
· If someone is injured in an accident, take the usual steps to render first aid, then seek out a telephone and summon the emergency services. Take the Landranger with you to the phone and use it to give directions to the operator.
· If you are unlucky enough to break down or slide off the road, first ensure that neither of you is injured. Then take out the warning triangle and place it 50-100m back up the road facing the oncoming rally traffic. If you are on the route, another competitor or the closing car will shortly arrive and offer assistance; if not, you will need to strike out and find a telephone.
Tactics
There are a few situations where a bit of tactical lateral thinking can save you some penalties, or cost your opponents more. Here are some good ideas; the sportsmanship of some is questionable!
· Instead of stopping just after a control to solve a clue, get the driver to carry on at a gentle pace to the next junction (what counts as a junction depends on whether it's AR, IGR or CRO). Describe the situation briefly, e.g. "Drive on to the next junction, it's just after a ninety and a bridge, it's a side road on the left by a house." The driver should take it easy, as you will not be reading the road, you will be working on the clue. Often, you can solve it by the time you get to the junction, and just shout "Take the side road! OK, 200 30 left ..." and begin to read the road. Driving on can save a lot of time.
· If you can't do a clue, follow someone who looks like they know what they're doing. A bit of a double-edged decision, because if they take you the wrong way you may end up worse off than if you had just cut.
· If you come into a control about to WD, it's worth sneaking past quietly on dipped lights with ducked navigator while the marshal is busy with other cars, going a fair way up the road to turn round, then storming into the control as if your life depended on getting the right time and the hounds of hell are on your tail. This has been done successfully more than once in a bright white Fiesta van, a tatty silver Saab 900, and a dark green Land Rover 101 army truck! Worth a try every time.
· Quite often, a group of cars will end up all stopped at a junction solving the clue. When one of them gets it, the rest invariably follow. If you are still solving, consider whether or not it is worth a try, but whatever you do take notice of where the other cars turn.
· If you are first to solve the clue and a competitor who is supposed to be ahead of you on time follows and "takes a tow", drive at a moderate pace, and judge it so you arrive at the next control just on time, and hence they will be late and incur a penalty.
· If you are obliged to let a competitor in your class past, because they are in a hurry and harassing you with lights, a good place to let them by is just before a code board, which you can thoughtfully obscure by pulling over in front of it and extinguishing your own lights.
· If you are being followed by another car, even if it is much less powerful, it will be difficult to shake, as the driver will be able to take advantage of your brake lights. Touching the brake pedal very lightly with your left foot in the middle of a straight to illuminate them is considered acceptable gamesmanship - a switch that disables the brake lights is neither acceptable nor legal.
· Another good one to try on a following car is to go just past the junction you want, then either appear to let them past, or outbrake them. Once they have gone past, execute a suitable autotest manoeuvre and go back the correct way.
Road Rallying in England and Wales
Road rallies south of the border have a slightly different flavour, but the basic idea is the same. The type of road rallying in Scotland is known as "Navigational Rallying", while a "Road Rally" is aimed at slightly more prepared cars, with simpler navigation and sections timed to the second. There are more strict controls on the type of car that may enter a "Road Rally" event.
Rather than having a Quiet Zone, English rallies use a special "neutral section", during which the navigation is easier and you are not penalised for dropping time, though you cannot make up any time either.
A regularity section is one where you have to try to maintain exactly the right average speed, and there will be an intermediate time control at some unknown point in the middle. These are mainly found on historic rallies, but English navigational rallies often have one, which counts in the scores only as a tie breaker; it is placed quite early on in the section, so having taken some time to solve the clue, it is a race to get to the regularity control as quickly as possible. This is not worth worrying about; just concentrate on the main event.
Road rallies in England often distinguish time controls by the type of section that precedes them; you might get a clue "TC13-MTC14". Time controls which you must visit to finish are identified as Main Time Controls (MTC's). The other special types are Neutral Time Control (NTC) at the end of a neutral section, and Regularity Time Control (RTC) or Intermediate Time Control (ITC) in the middle of a regularity.
The marking scheme used in England and Wales is based on the "Fails and Minutes" system. Penalties for dropping or making up time are counted in minutes, while missing a code board, doing a WD, or missing a time control is counted as "1 Fail". A score of "39 penalties" in Scotland might be "2 Fails and 9 minutes" in England. The result is decided on the number of fails, with competitors on the same number being separated by their "minutes" score. This places an even greater importance on getting the navigation correct at the expense of a bit of time.
It is not uncommon on southern events to run a "Panic Envelope" system. Competitors are not given a list of time controls; instead, they are given a bundle of small, numbered envelopes, each of which contains the map reference of the respective time control. Competitors are required to return them at the end of the rally, still sealed, and are penalised for each one they have opened. This "get out" system allows a greater range of ability to be tested, and often all classes from Novice to Expert will receive the same clues, with the Novice competitors expected to open more envelopes if they feel they need to.
There is a third type of time card only seen on larger rallies, known as a "Summertime Card". This computer-generated luxury has your Scheduled Times at each control printed across the top, then the next row shows times one minute late, and so on all the way down the page to OTL. This is very easy to use; the marshal just circles the time you arrive in the column for that control. You can see graphically how your Lateness is progressing. A Summertime Card for the example in the Timekeeping section would look like this:
Car 17 - F. Bloggs / A. Other - Novice - Start 20:17
Lateness TC1 TC2 TC3
0 20:23 20:30 20:41
1 20:24 20:31 20:42
2 20:25 20:32 20:43
etc.
29 20:52 20:59 21:10
30 20:53 21:00 21:11
Formula Wales
The term "Formula Wales" is a common euphemism to describe a distinctive type of event that is still run in rural parts of North Wales and Anglesey. These events are "pre-plot" with all navigation given out at the start in a very facile form, and the emphasis is entirely on driving and road reading. Keeping on schedule is intentionally impossible. Sections are short and timed to the second, with frequent stops required for complex code boards and signatures at special Three Metre Controls (passage controls with a control area of only 3m).
These events are quite spectacular, often attracting a full entry of 100 cars or more, and up to 5,000 spectators. Top competitors invest in heavily modified cars.
Navigational Scatters
A Navigational Scatter is a slightly different type of event, which is growing in popularity, as the organising costs (and hence entry fees) are lower, and much less effort is required to run one.
There are a number of control points at various locations on the map; visiting each one is worth a varying amount of points depending on how hard they are to find. You receive a sheet of navigational information for the control points at the start - some control points will be given simply as map references, some as rally clues, while others may require information you obtain by visiting another control point first. There is no obvious way to take them all in, but you must decide how much time to allow for plotting before heading out around the countryside, and plan a route to maximise your score.
Most scatter control points are not manned, and you are merely required to note down a detail off a road sign or house name, but there may be a Travelling Marshal, who is effectively a mobile control point which is at different locations at different times. The TM may even be in a moving car, circulating continuously round a looped route with a code board in the back window.
Tabletop Rallies
A tabletop is simply a rally without the car or the driver. You sit in a large room with the other competitors, and solve clues and plot them on the map. When you reach a time control, you put your hand up and a marshal will sign your time card and issue the next clue. In lieu of code boards, the clue will ask a question about the route you have drawn on the map and you will fill the answer in on your time card. You are often not given any list of time controls, and must solve all the clues "forwards" or panic if need be.
It is good practice for both driver and navigator to compete on tabletops, since a driver who is competent at clue solving is an asset to the crew. A navigator being beaten by their driver is not an infrequent occurrence and a good reason to poke fun at them!
Derek’s afterthoughts
· Both crew members should read everything thoroughly – regs., final instructions, etc.
· Most references to “road rally” actually mean NAVIGATIONAL RALLY. There is a distinct species of event called a “Road Rally” which is very ill-defined in the Blue Book, but quite well described in David’s section on English rallying. Even their events are largely navigational in nature; only a few seem to lean towards the rather less tame style, with timing to the second, and lots of tricks of timing and mileage.
· David used to persist in calling “side road left”. “Slot” is shorter. Only problem is that it can, in some cases, be confused with “slight” as in “slight left”, a totally different ball-game. So which one you prefer depends on how well the navigator can be heard over the car noise, i.e. on his diction and voice projection qualities.
· If you have any old maps of the area in which you are rallying, you can make up a set of joined-up maps. This could save you from having to line up the edges of two maps to see something that goes from one to the other, e.g. a tracing. Sometimes an organiser will be very devious and give you a section that darts back and forth between maps several times. These composite maps can be useful in this situation. I have even seen a clue that used MRs on both maps. In fact, I wrote it. There was an easy arithmetical solution, but a joined-up map would have been much easier.
·
· Additional abbreviations
NAM not as map INTR ignore no through roads
F fork Δ triangle (sometimes in conjunction NAM)
Y Yellow BL Blue ETL Electricity transmission line
B Brown W White CRO Coloured Roads Only
BK Black SR Side Road GI Graticule Intersection
TL Turn Left TR Turn Right AR Consider All Roads
FL Fork Left GL Grid Line IGR Ignore Gated Roads
FR Fork Right TJ T-Junction XR Crossroads
SH Spot Height km kilometres PC Passage Control
GS Grid Square SO Straight On MR Map Reference
TC Time Control m metres or miles [Derek McLean comment – there are lots of others]
· Glossary